
How to Create a macOS High Sierra Bootable USB: Solutions for Every Scenario
Creating a bootable USB for macOS High Sierra is not just a technical task, but a gateway to maintaining the health and efficiency of your Mac. Whether you’re looking to upgrade your system, install a fresh copy of macOS, or undertake crucial repairs, a bootable USB is an invaluable tool. This comprehensive guide is meticulously crafted to cater to a wide range of users, from those taking their first steps into the macOS ecosystem to seasoned professionals seeking efficient solutions.
In today’s fast-paced tech environment, staying updated with the latest macOS versions is crucial for ensuring security, compatibility, and optimal performance. High Sierra, known for its refined features and enhanced performance capabilities, marks a significant upgrade for many Mac users. However, direct updates are not always feasible or effective, especially for systems running significantly older versions or experiencing stability issues. This is where a bootable USB drive becomes essential, serving as a reliable medium for clean installations or upgrades.
Moreover, for users managing multiple Macs, especially in a corporate or educational setting, the ability to create a bootable USB drive for High Sierra simplifies the process of mass updates or installations, saving time and resources. It also provides a lifeline in situations where internet connectivity is limited or unreliable.
Our step-by-step guide encompasses various methods to create this indispensable tool, detailing each step to ensure clarity and ease of understanding. Whether you prefer using another Mac, taking advantage of the Internet Recovery Mode, or exploring the use of a bootable Linux USB, this guide has you covered. We also recognize that sometimes, the task at hand may require professional expertise. In such cases, our guide will point you in the right direction to seek the assistance you need.
As technology continues to evolve, staying adept and prepared is key. This guide not only aims to educate but also to empower you to maintain and upgrade your Mac with confidence, irrespective of your technical background. Let’s embark on this journey to unlock the full potential of your Mac with macOS High Sierra.
Introduction – Expanded: Creating a bootable USB for macOS High Sierra is an essential step for system upgrades, installations, and repairs. This comprehensive guide, updated with real user experiences, offers various methods to create this invaluable tool, suitable for different technical expertise levels.
Common User Experience: Many users, when attempting to download the macOS High Sierra installer, end up inadvertently downloading an update file rather than the full installer. This confusion often arises when searching manually in the App Store. It’s a common experience to download a file named something like “InstallOS.dmg” or an update package, which are not suitable for creating a bootable USB.
Introduction: This guide provides a detailed, chronological approach to creating a macOS High Sierra bootable USB drive, suitable for various scenarios including system upgrades and clean installations.
Preparation:
- Check Mac Compatibility: Ensure your target Mac is compatible with macOS High Sierra.
- Backup Data: Before proceeding, back up any important data on the Mac you’re using to create the bootable drive and the target Mac if applicable.
Step 1: Downloading macOS High Sierra
- Using Direct Link: Access the full installer using this direct link. Avoid the App Store to prevent downloading an incorrect version.
- Verify Download: Ensure the file name is “Install macOS High Sierra.app” and its size is around 5 GB.
Step 2: Creating the Bootable USB Drive
- Format USB Drive: Insert an 8GB or larger USB drive. Open ‘Disk Utility’, select the drive, choose ‘Erase’, format as ‘Mac OS Extended (Journaled)’, and name it (e.g., “HighSierraUSB”).
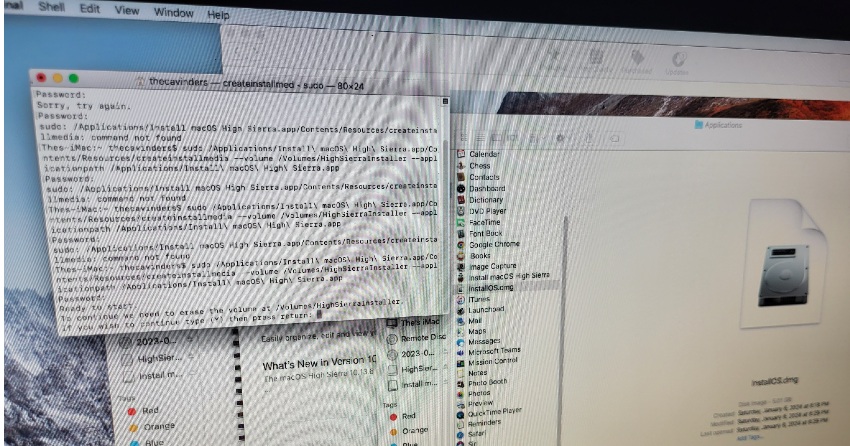
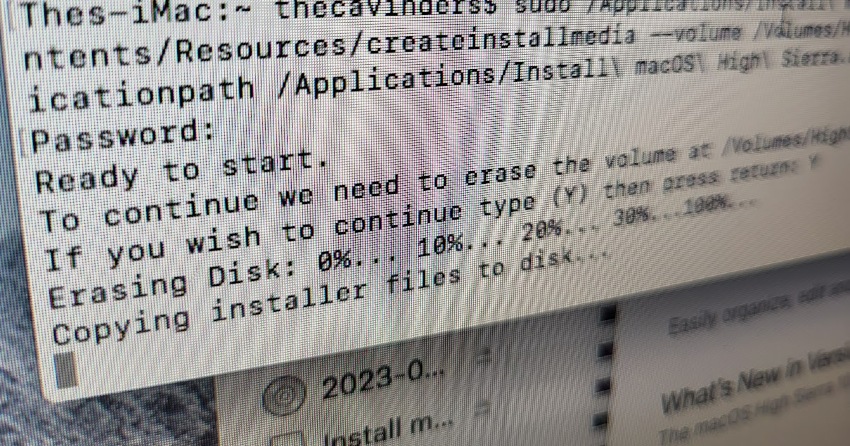
- Use Terminal: Open Terminal and input:
/Applications/Install\ macOS\ High\ Sierra.app/Contents/Resources/createinstallmedia --volume /Volumes/HighSierraUSBReplace “HighSierraUSB” with your USB drive’s name if different. - Wait for Completion: The process erases the USB and copies the installer. It may take some time.
Step 3: Booting from the USB Drive
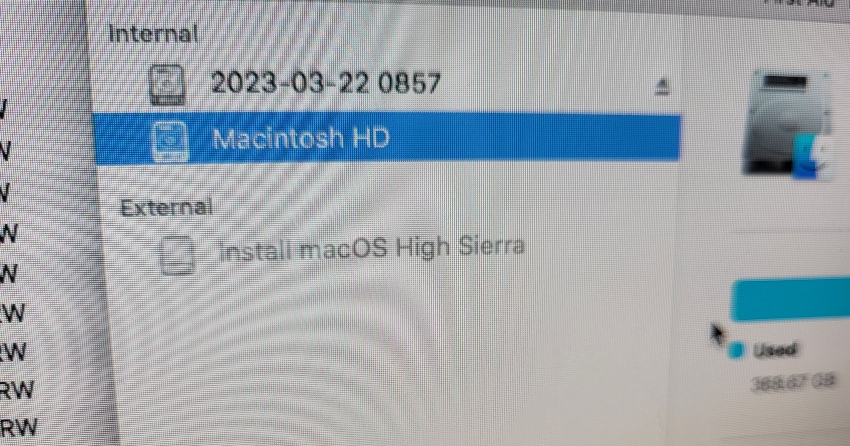
- Insert into Target Mac: With the bootable USB created, insert it into the Mac where you want to install High Sierra.
- Access Startup Manager: Restart the Mac and immediately hold down the Option (Alt) key until the Startup Manager appears.
- Select the USB Drive: Choose the drive labeled “Install macOS High Sierra”.
Step 4: Installing macOS High Sierra
- Disk Utility (Optional): If performing a clean install, first go to Disk Utility in the macOS Utilities window, select the Mac’s main drive, click ‘Erase’, and format as ‘Mac OS Extended (Journaled)’.
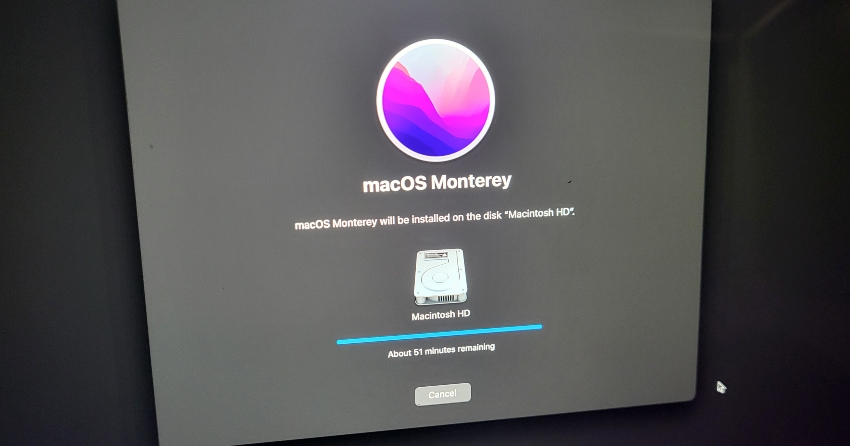
- Install macOS: Return to the macOS Utilities menu and select “Install macOS”. Choose the drive (erased or existing) and follow prompts.
Troubleshooting:
- USB Not Recognized: Ensure the USB is properly created and formatted. Try a different port or USB drive if issues persist.
- Errors in Terminal: Double-check command syntax and paths. Ensure the correct names of the installer and the USB drive are used.
- Boot Issues: If the Mac doesn’t boot from the USB, reset NVRAM by shutting down, then turning on and immediately holding Option, Command, P, and R keys for about 20 seconds.
Post-Installation:
- Complete Setup: After installation, follow on-screen instructions to set up user accounts and settings.
- Check for Updates: Once set up, check for any available updates in the App Store.
Enhanced Section: Resolving the ‘Recovery Server Could Not Be Contacted’ Error in macOS High Sierra Installation
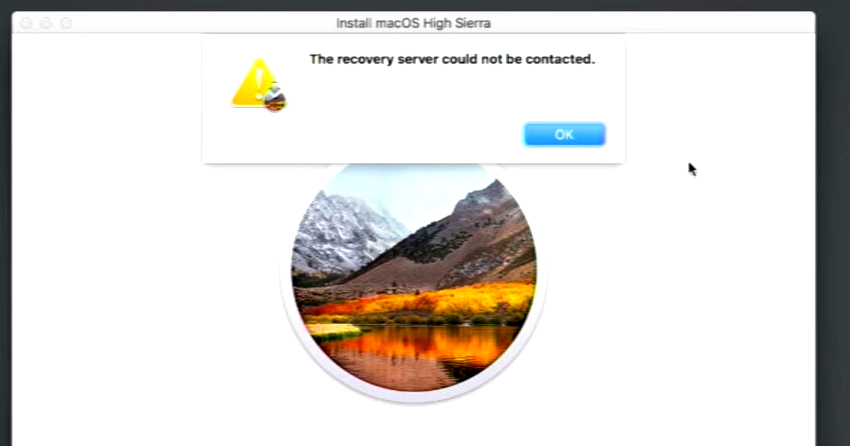
In addition to our detailed guidance on creating a macOS High Sierra bootable USB, this article now includes a crucial section addressing a common installation hurdle: the “Recovery Server Could Not Be Contacted” error. This issue, often encountered during the installation or reinstallation of macOS High Sierra through internet or regular recovery, can be a significant obstacle. Here’s how to navigate this challenge:
- Understanding the Error: This issue arises not because Apple has decommissioned older recovery servers, but due to an internal SSL security verification problem within the macOS High Sierra security framework. The system fails to contact Apple’s software update server, thus halting the installation process.
- Alternative Approach to Recovery:
- Boot to a Newer macOS Version: For Macs compatible with versions newer than High Sierra (e.g., Mojave, Catalina), use the Command + Option + R key combination at startup to access a more recent recovery environment. This method often circumvents the High Sierra-specific error.
- Create a macOS High Sierra Bootable USB: If you have a secondary Mac, creating a bootable installer for High Sierra can effectively sidestep this issue.
- Technical Fix: NVRAM Adjustment:
- In macOS Recovery, attempt to install High Sierra. When the error message appears, open ‘Installer Log’ to find the failed catalog URL.
- Use Terminal within the Recovery environment to change this URL. The modification involves switching the protocol from HTTPS to HTTP, which can be done with a command like:arduinoCopy code
nvram IASUCatalogURL="http://swscan.apple.com/content/catalogs/others/index-10.13-10.12-10.11-10.10-10.9-mountainlion-lion-snowleopard-leopard.merged-1.sucatalog" - After this change, attempt to reinstall macOS High Sierra.
- Completing the Process: Follow through with the installation setup, configuring necessary details such as language, network settings, and user accounts.
This enhanced section provides a deeper understanding of the “Recovery Server Could Not Be Contacted” error and offers a structured approach to resolving it, ensuring a smoother installation experience for macOS High Sierra.
Professional Help: If challenges persist or for more complex scenarios, consider professional assistance from services like EGB Services, SoFly Web Designs, Anytime Computer Service, or AI Intersection.
Conclusion: This thorough guide is designed to walk you through the process of creating and using a macOS High Sierra bootable USB. It’s detailed and technical, catering to users who prefer a comprehensive approach. For further assistance, Apple’s support resources are an invaluable tool.